


Measuring in Pixels
Unfortunately changing the ScaleMode does not change the units used to measure the width of the screen. To return the number of pixels used for the whole screen you can use two built in functions: TwipsPerPixelX and TwipsPerPixelY.
Example:
  Debug.Print "Width  = " + screen.Width / screen.TwipsPerPixelX
  Debug.Print "Height = " + screen.Height / screen.TwipsPerPixelY
Using information about the width and height of the screen and the width and height of all forms used in an application there can be no excuse for programs which display windows half off the screen.
Use Lower-case Titles
This tip has been borrowed from the field of Desktop Publishing (DTP). Where possible always use lower-case characters when creating titles or other textual items on a form. Obviously the initial character of each word can still be capitalised, but the rest of the word should be lower-case. The reason for this can be seen in the figure below. When a title is constructed entirely of capitals then the overall appearence of the word is a block (highlighted in red). However, when both upper and lower-case characters are used this visual block is broken up by the ascenders and descenders of each character. This makes it easier to recognise words.
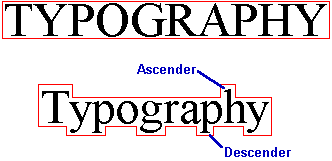
It should be noted as well that both the words in the figure above have the same point size. However, because capital letters are wider than their lower-case counterparts, the overall length of the word appears larger. To get round this problem use a slightly bigger font size with lower-case titles. And if you want your titles to stand out even more then read the next tip on constructing shadowed ‘3D’ titles.
Shadowed ‘3D’ Titles
Many of the simple applications built in the tutorials in this web site have used controls which are sensibly arranged so that the user can find and see each control easily. However, if one control overlaps or partially overlaps another then VB will place them at different levels on the form. This is very similar to the idea of different levels of objects in a DTP application. Normally the programmer will want each control to be totally visible, but there are times when partially hiding a control can be used to good effect.
A useful application of this layering approach is to emphasize important headings by using shadow. There is no shadow option in the properties window but we can easily emulate this by using two label controls. Create two separate label controls both with the same caption and font styles. Next make the one which will be on the top most layer transparent. Also, change the foreground color of the upper most control to black and change the foreground color of the lower control to white. Then move the top label over the bottom label but do not completely cover. The top label should be slightly higher and to the left of the bottom label. If you have the snapping to grid option still on then it may be easier to manually edit the top and left coordinates of each control using the properties window. The result when the program is run should look like:

Perfectly Centralised Titles
Because label controls have an Alignment property, which can be set to center, all the programmer needs to worry about is actually centralising the control with the form. This can quite literally be a moving target, windows can be resized. However, the form has a special Resize event which is used to deal with these situations. Set the Left property of the title label to 0 and then enter the following line in the form resize subroutine.
Private Sub Form_Resize()
  Label1.Width = Form1.Width
End Sub
Now run the program and try altering the width of the window.
Plan B: The above code works perfectly for centring labels, but what about controls where the programmer does not want to change their width. For example, to keep a command button in the centre of the screen the code would need to change to:
Private Sub Form_Resize()
  Command1.Left = (Form1.Width / 2) - (Command1.Width / 2)
End Sub
The code works by setting the left property of the command button to equal half the width of the current form. However, because the left property has been set (there is no centre property) the control will still be slightly off centre. To make it perfectly centralised, half the width of the command button itself will need to be subtracted as well.
Irregular Shaped Buttons
Although VB has in-built controls for textual buttons and buttons with graphics, both types are rectangular. What can you do if you want a button that has an irregular shape like a circle or triangle? One answer is to borrow the Click event of an Image control. Create the button image you require in an art package and then save it in BMP format. Next load the graphics file(s) into Image controls like the left hand side of the figure below. Next set the background colour of the form to match the background colour of the graphics, in this case grey. When run the actual rectangular boundary of the images should be indistinguishable from the form like the graphics on the right hand side of the figure below.

Note: The clickable area will still be the rectangular area taken up by the Image control. However, as long as the image occupies most of the space this should not be too much of a problem.
Remember Secondary Validation!
After validating a field (e.g. Title = Mr, Mrs, Ms, Dr, etc.) remember that although the field is valid it may still conflict with another valid field. For example, if a user enters ‘Mrs’ in the Title field and then by mistake enters ‘Male’ in the Gender field then this is definitely wrong. However, remember that titles like ‘Dr’ and ‘Prof’ can be both male or female.
A second example of secondary validation could be to check that the Area Code of a telephone number is either 0171 or 0181 if City equals ‘London’. It could be argued that there are thousands of possible area codes to check with thousands of towns and cities. However, if only the top ten largest cities in Britain were checked then this would by itself represent several million households.
Warning: Always remember that validation is there to help avoid errors, not create them. Always check that ALL valid inputs will be accepted by the validation system. For example, with the above example of checking telephone area codes, will the validation work with Mercury as well as BT numbers?
Mind your language!
Always try to avoid using ambiguous language. Although the road sign is probably obvious to most drivers, its meaning can be subject to many possible interpretations:

Only use jargon when it is certain that the users of the system will understand. For example, take an online system to help diagnose car engine problems: a qualified engineer might know that “does the car turn over” refers to the engine running correctly, but a novice might interpret the same question as meaning the whole car over turning (like some models of 4WD vehicles at the end of the 1980’s).
Getting Plurals Right
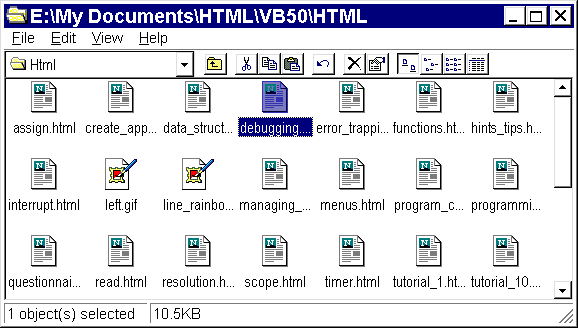
Microsoft in their design of Windows 95 have been quite lazy in some of the details. Take for example the window status bar in the screen shot below. Instead of altering the word ‘object’ to ‘objects’ if more than one file is selected, they have instead opted to use ‘object(s)’ for all eventualities.
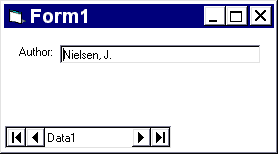
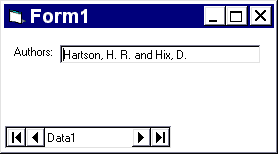
To fix the above situation only seven simple lines of code are needed. The code below is placed in the Reposition event of a data control. This means that every time one of the arrow buttons is selected and a new record is displayed the subroutine will be run. As the screen shots below the code show, the program tests to see if the word ‘and’ exists in the Authors field. If it does then it sets the caption of the author label to ‘Authors’, if not then it will be set to ‘Author’.
Private Sub Data1_Reposition()
  If InStr(txtAuthors.Text, "and") > 0 Then
    lblAuthors.Caption = "Authors:"
  Else
    lblAuthors.Caption = "Author:"
  End If
End Sub
Simplify where possible
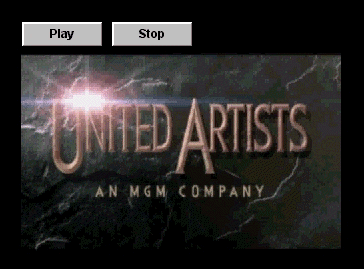
This example is taken from a real student project. The student created a walk-up-and-use multimedia interface which would be used at a local cinema. The figure below shows part of one of his screens which has an embedded AVI file (using the ActiveMovie control) which plays a clip of the latest Bond film. The main problem with this interface, as it currently stands, is that both ‘Play’ and ‘Stop’ buttons are enabled. Obviously a user cannot stop a clip which has not already started, and conversely it is difficult to play an already playing clip.
One solution to the above problem would simply be to set the ‘Stop’ button to disabled (Enabled = False) and then to re-enable it after the ‘Play’ is clicked. However, there are still two buttons taking up space on the interface. A much cleaner solution would be to use only one button for starting and stopping. The figure below does exactly this, but so as to signify that the button has changed (caption change alone might be missed) the button changes colour. Green and red colours were choosen to create a pseudo-traffic light metaphor.
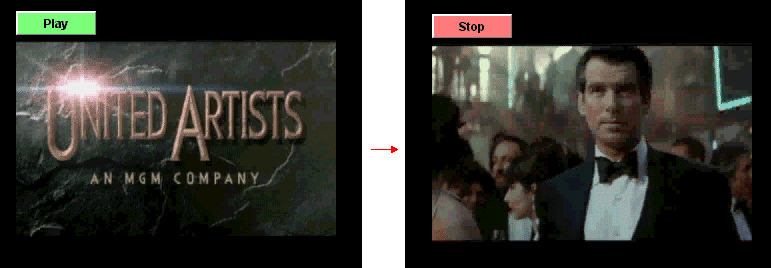
The code is quite simple. The play/stop button takes a click event, checks to see what the current button caption is and takes appropriate action. And a second event on the ActiveMovie control is used to set the play/stop button caption back to ‘Play’ after the movie finishes. If this second subroutine wasn’t there then the user would play the movie, the button would change to red and say ‘Stop’, the movie would finish but the button would still remain red.
Private Sub cmdPlayStop_Click()
  ' Code to change the caption and colour of the play/stop button
  If cmdPlayStop.Caption = "Play" Then
    cmdPlayStop.Caption = "Stop"
    cmdPlayStop.BackColor = &H8080FF     ' Light red
    ActiveMovie1.Run
  Else
    ActiveMovie1.Stop
    cmdPlayStop.Caption = "Play"
    cmdPlayStop.BackColor = &H80FF80     ' Light green
  End If
End Sub

Private Sub ActiveMovie1_StateChange(ByVal oldState As Long, ByVal newState As Long)
  ' Code to change the play/stop button back to Play if the movie has finished
  If newState = 0 Then
    cmdPlayStop.Caption = "Play"
    cmdPlayStop.BackColor = &H80FF80      ' Light green
  End If
End Sub
Can I use returns in a Label?
There are times when a programmer may wish to display several lines of text on a form (see the screenshot below). However, there is no way to enter carriage returns into a label’s caption in the properties window. One solution would be to use one label for each line of text required. This would work, but if the text needs to be hidden or moved at some stage, each label must be manipulated separately. It would be much simpler if all the lines of text could be put into a single label control.
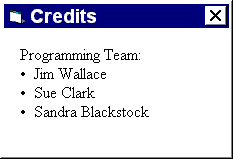
To achieve the above four lines of text, special characters must be entered to create the carriage returns. Each new line requires a carriage return - chr$(13), followed by a linefeed - chr$(10). Alternatively the built-in constant ‘vbCrLf’ can be used instead (as seen below):
Private Sub Form_Load()
  Label1.Caption = "Programming Team:" & vbCrLf
  Label1.Caption = Label1.Caption & "•  Jim Wallace" & vbCrLf
  Label1.Caption = Label1.Caption & "•  Sue Clark" & vbCrLf
  Label1.Caption = Label1.Caption & "•  Sandra Blackstock"
End Sub
To make the program more readable the code above is structures in a similar way to its final appearance. For example, the first line assigns the text ‘Programming Team:’ and a carriage return to the caption of label1. The next line then adds the current contents of label1 to itself and then adds ‘Jim Wallace’ and a carriage return. It is important to add the contents of label1 to label1 on all lines of code apart from the first because if not then the only line which would be displayed would be the last line. Finally, all the above code is placed into the Form Load event of the form which contains the label. Although the text will not be available at design time it will be fully formatted when the form is displayed at run time.
NOTE: The bullets were created by copying bullet characters from the Windows 95/NT Character Map and pasting them into the code. Arial and Times New Roman both have bullet characters but MS Sans Serif does not.
 |
If any students have any hints or tips which they think would be useful then please contact Simon Wilkinson or the lecturer who takes Visual Basic programming or HCI. |
 Menu
Menu