
A common problem for inexperienced Visual Basic programmers is the problem of disappearing buttons, you put a button on the form in the bottom right corner and now when you run it on another computer the button has vanished without a trace! The problem is easily avoided once you learn a bit about resolution. Different monitors can, regardless of size, handle different resolutions. Resolution is the number of pixels used to display the interface expressed as width times height. Buttons and other controls disappear when, for example, you put one at 700, 500 and then change to another computer which can only display 640 x 480 pixels. All resolutions start at 0, 0 at the top left hand corner of the display.
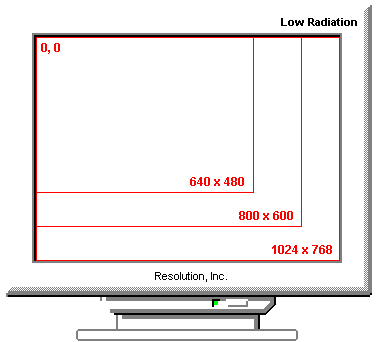
The figure above shows the relative amount of space afforded by three different resolutions. Obviously you never get a big gap along the right hand side and the bottom, each resolution expands to fill the available viewing area of the monitor. The effect is that as resolution size increases the size of all controls and windows decreases when using the same physical size of monitor. This is because it has to cram in so many more pixels into the same space. So that the interface does not become too small users often purchase 17", 19" or even 21" monitors when working with resolutions greater than 1024 x 768.
The answer is yes, and you don’t have to write several versions of the same program. The best way to create resolution independent programs is to use the Resize event of a form. Thus, when a form is resized, either as the result of a change in resolution or because of a user action, all controls can be repositioned.
To test this out write a small VB program with a single form in it. Onto this form place four controls (buttons or labels will work best). Next set their captions to ‘Top Left’, ‘Top Right’, ‘Bottom Left’ and ‘Bottom Right’. Place these controls in the corners of the form which match their captions (e.g. ‘Top Right’ in the top right hand corner of the form).
Run the form now and resize it a few times. None of the buttons move. This is because they are ‘glued’ to the top and to the left by the Top and Left properties. Stop the program and double click on the form to bring up a code window. Next, change the event to Resize and add the following code (remarks are not compulsory).
Private Sub Form_Resize ()
  Rem cmdTopLeft.Left remains the same
  Rem cmdTopLeft.Top remains the same

  cmdTopRight.Left = frmResize.Width - 1600
  Rem cmdTopRight.Top remains the same

  Rem cmdBottomLeft.Left remains the same
  cmdBottomLeft.Top = frmResize.Height - 1000

  cmdBottomRight.Left = frmResize.Width - 1600
  cmdBottomRight.Top = frmResize.Height - 1000

End Sub
Run the program again now and see what happens when you resize the form this time. If the controls are too close to the sides of the form then just increase the number subtracted from the form width. If the buttons are too far from the sides then simply decrease this number a bit.
Note: in the above example the right hand buttons are always 1600 twips less than the width of the form. This means that whatever the size of the form is the buttons will always appear to be the same distance from the sides. An alternative way to reposition and resize controls is to use variable calculations. For instance we could write cmdBottomRight.Left = (frmResize.Width / 2) - (cmdBottomRight.Width / 2). This would have the effect of always centralising a control.
The good thing about using graphics today is that you don’t need to be an artist to make a good interface, all you need to know is what you should put into an interface to make it good. Many Windows applications come with a large amount of clip-art which is copyright free and may be used in documents, charts, presentations, etc. Visual Basic is no exception, look in:
There are five main types of graphics which Visual Basic can handle: bitmaps (.BMP, .GIF and .JPG), icons (.ICO), and meta-files or vector-based graphics (.WMF). Bitmaps store data about every single pixel in the image. The larger the image, and the higher the colour resolution, the bigger the resulting file size is. The only bitmap format supported by Visual Basic version 4.0 and below were BMP. However, this format is not very efficient and results in large file sizes. Instead, when working with VB 5.0, use GIF format for images containing large blocks of the same colour (simplistic clip-art, diagrams, charts, etc.) and JPG for photo-realistic images. JPG images can have several different levels of compression, but note that the higher the compresssion used the poorer the image will look. Icons are similar but normally much smaller physically in size. They can be used for application icons displayed on the desktop or used for toolbars within applications. Meta-files store graphical information in a totally different way to bitmaps. Instead of storing each and every pixel which can take up a lot of space, vector graphics only store mathematical formulae which describe the picture. Take a very simplistic house for example, you could draw the main bit using a rectangle and then add a triangle on the top. A meta-file would only store where these two shapes are on the image, their dimensions and colour. The advantages of meta-files are that they tend to require less disk storage space to hold images, they can also be scalled up or down considerably without affecting quality. One of the problems with bitmaps is when you increase them in size they become blocky. The disadvantage with meta-files is that they cannot handle photo-realistic images, this has to be handled using bitmaps.
As well as the five graphics formats supported by Visual Basic there are a lot of other formats. If needing to use a graphic in the wrong format (e.g. TIF), then a graphics processing application which can open and save both source and destination formats is required. The table below lists some of the more common graphic file formats for MS Windows and some of the applications which support these formats (not an exhaustive list).
|
Warning: Some file formats have several sub-formats as well. For example, GIF images which are often used for the Internet come in 4 varieties: 87a (interlaced), 87a (non-interlaced), 89a (interlaced), and 89a (non-interlaced). Always make sure you know which format you require for which task.
Remember: the higher the resolution used the smaller the colour depth will be. This is because any one graphics card only has a finite amount of memory on board. Thus, as the card processes more pixels in the higher resolutions it has to make extra memory space available by handling fewer colours. For example, most video cards with 1Mb of memory can support 640 x 480 in 16.7 million colours, 800 x 600 in 56,535 colours, and 1024 x 768 in 256 colours. Obviously if you need photo-realistic photos displayed then you either have to use lower resolutions or find a graphics card with 2 or 4Mb or memory installed.
Current monitor technology can only display a two dimensional user interface. However, there are tricks and techniques which the user interface designer can employ to create the illusion of depth. One of the most common of these techniques is the use of shadows. To do this all you need to do is work out whether you want your object to appear as if it is set into the interface or looks like it is standing out from the interface. The only other piece of information you have to remember is that the light source for user interfaces is always in the top left hand corner of the display. The light shines down and to the right at a 45 degree angle. Have a look at the figure below and see which logo looks recessed and the other protruding.
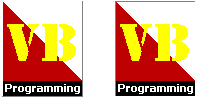
The above image should look like the left hand logo stands out from the interface slightly and the right hand one is slightly recessed.
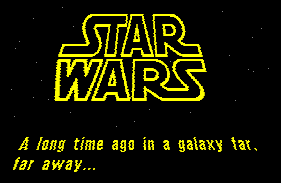
Another technique for creating the illusion of depth is to use perspective. The Star Wars opening title and text can be emulated using the deformations facility in Paint Shop Pro. The image below was drawn normally first, then its colour depth was increased to 16.7 million colours to enable the deformations menu, then given a -50 vertical perspective. When the deformation was completed the colour depth was put back down to 16 colours to save space.
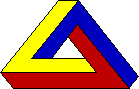
Question: What happens when you make a mistake when using perspective? Certain artists, such as M. C. Escher, have gone to great lengths to get the perspective wrong. As you can see from the figure below, getting it wrong can produce some spectacular results.
Splash screens are small centralised windows which carry the name of the product, authors and sometimes copyright information. Splash screen windows do not have any title, borders or controls and disappear after about 2 or 3 seconds. The example below is a splash screen for a fictitious chess game called Black Tower Chess. The checker board background was created in Paint Shop Pro. To begin with a single square of any colour was created. Next, this square was copied and put along side the original, and then filled an alternative colour. These two squares were then copied many more times, enough to make a large enough board. After that the colour depth was increase to 16.7 million colours to enable free roatation of the image by 15 degrees. Following the rotation the colour depth was put back down to 16 colours to save space. Then, using the rectangle tool, a section was cut out of the board the exact size of the final splash screen. A black castle was found in a clip-art library and opened as a separate image file. Using the magic wand this was copied onto the image with the checker board background. The text “Black Tower” above and “Chess” below adds the name of the product, and Wilkinson Enterprises adds the software house and copyright information. Finally, the shadow which makes the whole splash screen look raised was added to the graphic, it is not a property within Visual Basic.
To actually use the splash screen within Visual Basic the GIF file was assigned to the Picture property of a form. An extra picture or image box is not required. In the form load event the form is centralised with the screen and a timer is added to the form to load the main software form after 3 seconds (interval = 3000).
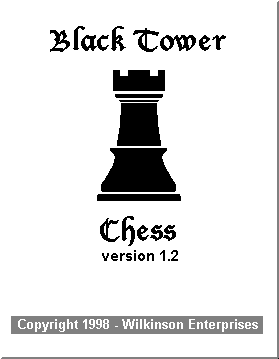
Note: The title of the software “Black Tower Chess” was done in Lucida Blackletter font to emphasise the historical background of the game of chess.
Tip: Make sure the contrast between background and foreground colours are always as large as possible. In the above splash screen light grey checks are used instead of dark grey because this makes it easier to read the black text. The software house name in white has been placed on a dark grey background again to maximise contrast.
 Menu
Menu