
Visual Basic calls the collection of files that make up an application a project. A project consists of:
One file for each form (.FRM)
One file for each code module (.BAS)
One file for each custom control (.OCX)
One Visual Basic Project file that keeps track of all the forms, modules and components used by the project (.VBP)
On launching Visual Basic 5.0, the Project window will show one project with a single form. However, all but the very simplist applications will involve multiple windows and dialog boxes. The screen shot below shows the Project window with Microsoft’s MDINOTE.VBP example loaded. As you can see there are three forms used by this project and two modules.

The files with a .FRM extension contain all the information associated with the forms. Details of the controls, their properties and all code attached to screen objects. There are three types of form:
![]() Standard form - use for SDI interfaces and dialog boxes
Standard form - use for SDI interfaces and dialog boxes
![]() MDI Parent form - use only one in an MDI project
MDI Parent form - use only one in an MDI project
![]() MDI Child form - use as many child forms as necessary
MDI Child form - use as many child forms as necessary
Modules are similar to form modules but they do not have any visible attributes (i.e. forms or controls). These standard modules are used to place public variables and public subroutines which can be accessed by code anywhere in the current application.
.OCX files are used to add more controls to the toolbox. Microsoft ships many ‘custom controls’ which may be added, as well as other controls available from third party developers. Controls can be added or removed from a project by going to Project/Components....
The VB Project file (.VBP) contains file names of all the project’s constituent files (.FRMs, .OCXs, .BASs) and path details for these files. The project file also stores information about the VB environment settings. Projects files are stored in ASCII format and so are readable by applications such as Notepad. However, do NOT attempt to change any lines in this file unless you are sure that you know what you are doing!
| ||||||||||||||||
| ||||||||||||||||||||||||
Note that projects can share common files. However, it is important to realise that VB only stores one copy of the file. When you add an existing file to a project, VB does not make a copy of the file in the existing project. This means that any change to a file will affect all the projects that use that file. To change a file in the current project without unwanted consequences elsewhere, use the Save File As option to change its name.
Beware of deleting files outside the VB environment. If files are deleting from within a project, the .VBP file is updated to reflect the deletion. However, if a file is deleted (for example from the File Manager) the VB application(s) that use it cannot know, the .VBP file(s) will still expect it and an eror message will occur.
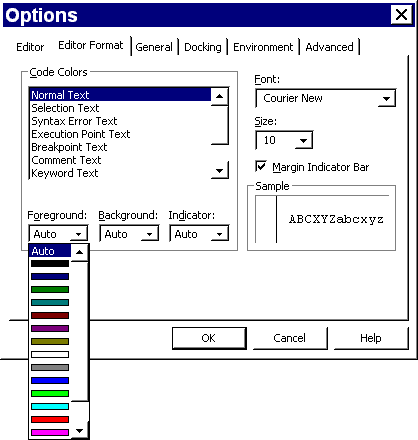
Many settings in the Visual Basic development environment can be customised to suit the user. These are listed in one main tabbed dialog box which is accessible by going to Tools/Options. The screen shot below shows this dialog box which is currently set to ‘Editor Format’. Another important tab is the ‘Advanced’ options screen. Here a check box is provided to select ‘SDI Development Environment’. By selecting this option it is possible to customise Visual Basic 5.0 to look similar to versions 3.0 and 4.0.
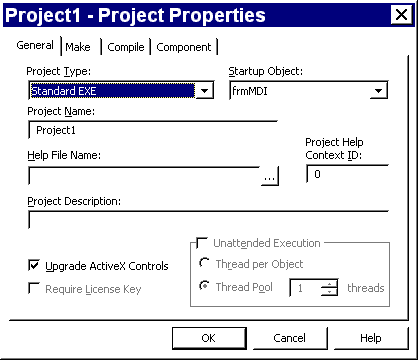
The ‘Project Properties’ dialog box, available from the ‘Project’ menu, is very useful. The ‘Startup Object’ combo box (on ‘General’ tab) is useful for controlling which form appears first when the application is run. Also, on the ‘Make’ tab, comments, company name, copyright notice and other details can be written. After the application is compiled these details are made available to Windows under the EXE file’s properties.
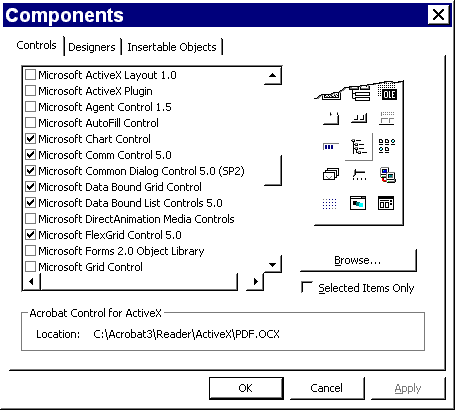
The first thing to do once an application (project) has been completed is to remove any unnecessary bits. A final check through all forms to check for unused controls and a check of the code for any debugging commands should be performed. After this select ‘Components’ from the ‘Project’ menu and de-tick all items (see screen shot below). Do not worry, if any component is used by the project Visual Basic will warn you about it (just leave these in).
Now that any wasted space has been removed, an executable file (.EXE) can be created. To do this select ‘Make Project1.EXE...’ from the File menu and enter a suitable file name. You can specify an icon for the application by selecting the ‘Options...’ button.
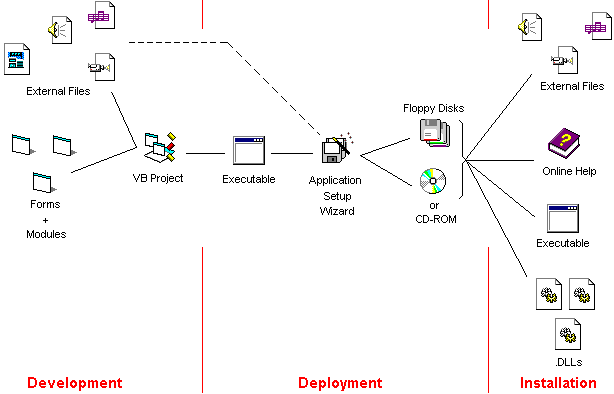
At this stage there should be a fully working .EXE file which can be run directly from the Windows Explorer or Desktop by double clicking. However, if the program is moved to any computer without the Visual Basic development environment then it will stop working. The reason for this is that all VB applications need a DLL (Dynamic Link Library) for standard VB functions and then a number of additional DLLs for any custom controls used. Because there can be a number of such files needed, and their location in the target machine is important, so it is best to use VB’s Application Setup Wizard to automate the process. The diagram below shows the three main phases of application development. On the left side there are all the form and module files referenced by the VB project file. Also, graphics can be included at design time (these become embedded into the forms) and any additional media files (e.g. sound files, video sequences, etc.). The centre phase, here termed ‘deployment’, is where the project is made ready for shipping using the compiler and the Application Setup Wizard. The final phase on the right is the installation phase. This is when an end-user takes the application installation disk(s), runs the setup.exe file, and installs all necessary files on some target machine.
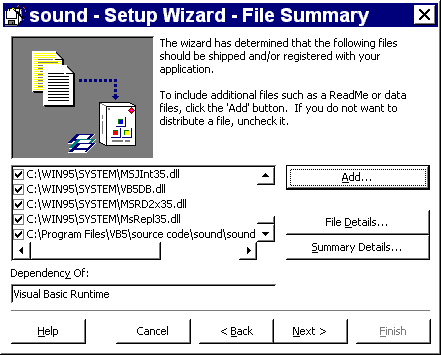
It is important to remember when using the Application Setup Wizard that not all files are combined together to form the EXE file. For example, although graphics files are embedded, sound (.WAV, .MID) and video (.AVI) files are not. The setup wizard must be told about any external files so that these can be included in the deployment version (either on floppy disk or CD-ROM). The screen to add these file is:
 Menu
Menu