

The objective of this tutorial is to learn how to design and make ActiveX controls. At the end of this tutorial you should be able to:
Design and save an new ActiveX control
Copy the control so that other applications can use it
Insert it into another VB project and an Office 97 application
Because there is a lot of code in the example below, the project has been saved and made available in the following ZIP file: ACTIVEX.ZIP.
Start Visual Basic in the normal way and at the ‘New project’ dialog box select ‘ActiveX Control’.
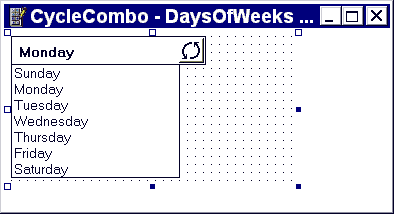
Next, add various controls from the normal toolbox to the project to build up a simple application. The screen shot below shows a new ActiveX control which will be designed to be a new type of combo box. The button on the right hand side with the two arrows will cycle through the days of the week. Also, by clicking on the text a drop-down list of all seven days will be available. The whole control is made up from: 1 label, 1 picture box (containing graphic of button with two arrows), 1 shape (rectangle around whole control), and 1 list box. A picture box has been used instead of a command button to prevent a dotted rectangle being drawn on the button when it has focus.

The next thing to do is to add the code behind the various controls.
  Private Sub lblDay_Click()
    ' The Height of the control is extended to make room for the list box to drop down
    UserControl.Height = 2130
    lstDaysOfWeek.Height = 1710
    lstDaysOfWeek.Visible = True
  End Sub

  Private Sub lstDaysOfWeek_Click()
    ' Code behind the click event of the list box
    lblDay.Caption = lstDaysOfWeek.List(lstDaysOfWeek.ListIndex)
    lstDaysOfWeek.Visible = False
    ' Reset the Height of the control
    UserControl.Height = 435

    RaiseEvent DayChanged
  End Sub

  Private Sub picCycle_Click()
    ' Code behind the button with the two arrows
    If lblDay.Caption = "Monday" Then
      lblDay.Caption = "Tuesday"
    ElseIf lblDay.Caption = "Tuesday" Then
      lblDay.Caption = "Wednesday"
    ElseIf lblDay.Caption = "Wednesday" Then
      lblDay.Caption = "Thursday"
    ElseIf lblDay.Caption = "Thursday" Then
      lblDay.Caption = "Friday"
    ElseIf lblDay.Caption = "Friday" Then
      lblDay.Caption = "Saturday"
    ElseIf lblDay.Caption = "Saturday" Then
      lblDay.Caption = "Sunday"
    ElseIf lblDay.Caption = "Sunday" Then
      lblDay.Caption = "Monday"
    End If

    RaiseEvent DayChanged
  End Sub

  Private Sub UserControl_Resize()
    Shape1.Width = UserControl.Width
    picCycle.Left = UserControl.Width - 410
    lstDaysOfWeek.Width = UserControl.Width - 410
    lblDay.Width = UserControl.Width - 460
  End Sub
After adding the ‘standard’ code to the controls it is time to add some ActiveX specific code. Bearing in mind that this control will be used in other applications there must be a way for that program to determine what day of the week the new combo box is set to; although the user can see the name of the day on the screen, there must also be a way for the program to find out. To do this the programmer can add a Property to the ActiveX control. To read from a property use the command Get and to change the value of a property use Set. The code below creates a new property called ‘Day’ which returns the value of lblDay.Caption. Remember that once individual controls are incorporated into an ActiveX control then can no longer be refered to by an external application, they must be changed using programmer defined property subroutines.
  Property Get Day() As String
    Day = lblDay.Caption
  End Property
The subroutine below shows how the font of the new ActiveX control can be set. Remember that both the label and the list box both contain fonts.
  Property Let Set_Font(font_name As String)
    lblDay.FontName = font_name
    lstDaysOfWeek.FontName = font_name
    PropertyChanged "Set_Font"          ' Notifies the container that a property's value has been changed.
  End Property
At the moment an application using the new ActiveX control can interrogate it to determine the current day, but the program does not know exactly when the day changes. To be able to do this a new Event must be defined by placing the following line in the General Declarations section of a Module: Public Event DayChanged().
To then make the event work the keyword RaiseEvent should be used (see first code example above). So for example, after selecting a new day from the list or clicking on the arrow button, the event should be raised by writing the following line RaiseEvent DayChanged.
In addition to Properties and Events, Methods can also be defined. The code below defines a Public method called ‘NextDay’ which will allow a parent application to advance the control one day forwards. The code is very simple, aside from the beginning and end statements for the subrountine, there is only one line which is actually a call to the subroutine picCycle_Click (see first example above). This event in effect will, under program control, do the same thing as a click on the arrow button.
  Public Sub NextDay()
    picCycle_Click
  End Sub
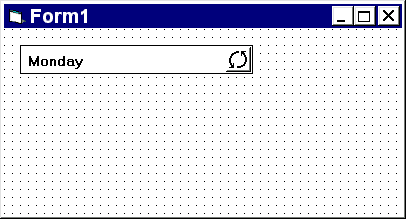
When all the various controls have been added and the code written for specific properties, events and methods, it is time to test the ActiveX control. However, if the program is run in the usual way by selecting  then an error will occur: “Control projects cannot be run alone...”. What this means in English is that the project currently being developed is an ActiveX control, but normally ActiveX controls are embedded into parent applications. Thus, to solve the problem and test the new control it is necessary to select File/Add Project... and then click on Standard EXE. This will open up a standard EXE file type project with a normal form visible. Close the ActiveX control window and then select the new ActiveX icon
  which should have appeared in the toolbox. Go over to the blank form and draw out a rectangle big enough to hold the ActiveX control. You should by now have something similar to:

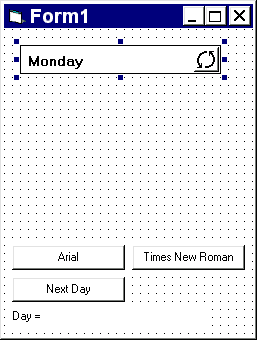
The new ActiveX control should by now be working in the form of the parent application (Project2.vbp), the list box and arrow button should work perfectly, but there are still several properties, methods and events to be tested. All these will be tested using Form1 (see screen shot below). The listings show the code behind the command buttons.
  Private Sub cmdArial_Click()
    UserControl11.Set_Font = "Arial"
  End Sub

  Private Sub cmdNextDay_Click()
    UserControl11.NextDay
  End Sub

  Private Sub cmdTimesNewRoman_Click()
    UserControl11.Set_Font = "Times New Roman"
  End Sub

  Private Sub UserControl11_DayChanged()
    ' Double click on the ActiveX control and select the DayChanged event
    lblDisplayDay.Caption = "Day = " + UserControl11.Day
  End Sub

Before using the ActiveX Control in any other application there are a few more things to be done. First its name should be changed to something meaningful. To do this goto Project/Project1 Properties... and enter a suitable name where it says ‘Project Name’ (e.g. CycleCombo).
Select File/Make CycleCombo.ocx and same the completed ActiveX control.
If the OCX file has been saved in the same form as the development projects then Windows 95/NT will probably not recognise it. To do this copy CycleCombo.ocx from its development folder and put it in Windows\System.
Select one of the Microsoft Office 97 applications which can use ActiveX controls (Access 97 is a good choice).
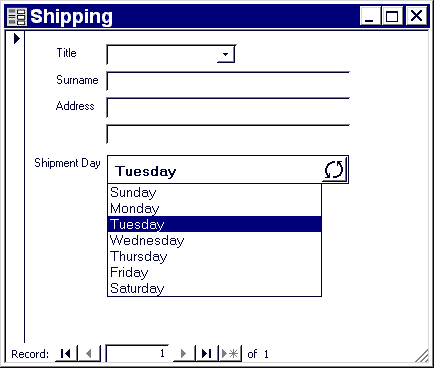
Create a form if none already exist and then select Insert/ActiveX Control.... Find CycleCombo on the list, select it, click OK and place the control on the form. Similar procedures exist for the other Office applications and Visual Basic itself (Project/Components).

As practice try creating an ActiveX control which will display a shadowed piece of text. This is tip 3 under the Hints & Tips page. To create this you will need to use 2 separate labels which both have the same caption. Next create some properties so that an application using this new ActiveX control can change the text displayed in the control, the font name, font size, foreground text colour and background shade colour.
 ActiveX.com
 Tutorial 16 (Creating a Windows Help file)
 Menu
Menu