
The objective of this tutorial is to learn how to write and compile a Microsoft Windows Help file and then be able to call this file from a Visual Basic application. At the end of this tutorial you should be able to:
Write a Help file and understand its syntax.
Compile a RTF source file into a Help file using the Help Compiler Workshop.
Incorporate a help file into a Visual Basic application.
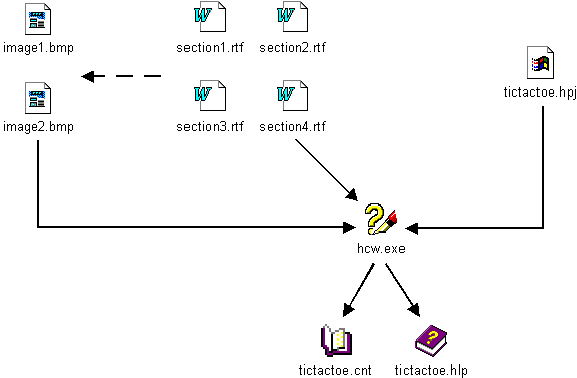
There are a number of different files needed to create a Windows Help file. As the figure below shows, a Help file is made up of one or more Rich Text Format (RTF) files which contain the text of the help file, hypertext links and pointers to any graphics file, and a Help Project (HPJ) file which holds settings and file names of all the source RTF files. These three different file types are then processed by the Help Compiler Workshop to produce a help file (.HLP) and a contents file (.CNT).
Microsoft Windows on-line help files are generated using Rich Text Format (.RTF) source files. Many word processors can save documents in this format including MS Word. Each help file can have multiple topics and multiple links between topics.
Specifying Individual Topics
Use ordinary page breaks to specify where one topic (or node) ends and another begins.
Topic ID
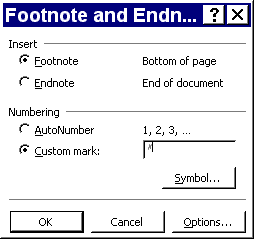
Use a ‘#’ footnote to specify a unique topic ID. Any characters apart from # = + @ * % ! can be used as an ID.
Title of Topic
Use a ‘$’ footnote to specify the title of each topic. The title will be used by the Index and Find facilities.
Incorporating Graphics
Windows bitmap (BMP) formatted graphics can be incorporated into help files. Do not paste the graphics directly into the word processor, but instead write the name of the file inside {bmc }.
Example: {bmc test_image.bmp}
Jump Link
To create a link which will replace the currently displayed topic with a new one, first write the text or insert a graphic which will form the link, now double underline it, and then immediately after it write the topic ID (see above) of where the link will go and place it in hidden text. The example below shows a link to the ‘Introduction’ topic.

 icon must be depressed. Hidden text is displayed with a dotted underline.
Popup Window Link
Defining a popup window link is exactly the same as a standard jump link but the link text is only single underlined not double. As the example below shows, the text which will visibly show the link is ‘human-computer interaction’ and the ID of the topic which will be displayed is ‘Gloss_human-computer interaction’.

Sequence
In order for the Help engine to display previous  and next
  buttons to move through a help file, it is necessary to establish which topics will be part of the sequence. To do this create a ‘+’ footnote and write ‘auto’ as the text. Place this footnote in every topic which is to be included in the sequence.
Index Term
To create an index go through the whole help file and where you want the index to jump to, place a ‘K’ footnote and write the index description in the text of the footnote. If the same index description is used in a number of Topics, the Help engine will present a choice when the index entry is selected.
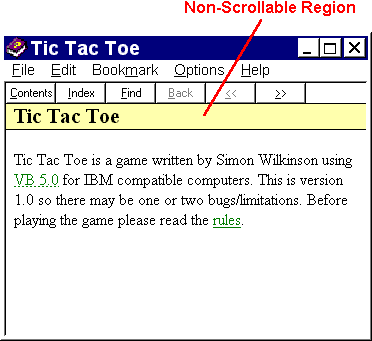
Non-Scrolling Region Text
The title of the current topic is usually displayed inside a non-scrolling region of the help window just under the pulldown menu. The text which goes inside this area can be defined by selecting the line in Word 97 and then going to Format/Paragraph, select the Line and Page Breaks tab and make sure Keep with next is selected.
Start the Microsoft Help Compiler Workshop application (C:\Program Files\Help Workshop\HCW.EXE).
Select File/New..., then Help Project and provide a suitable file name with the extension ‘.HPJ’. A window should now be displayed similar to the screen shot below:
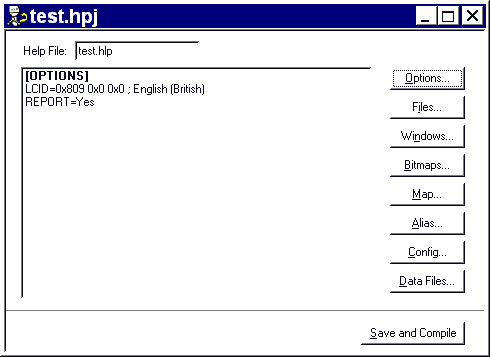
So far all that has been created is a new help file project. This is quite similar to a Visual Basic project file in many ways, it is used to determine which files and settings are used in the compilation process. Click on the ‘Files...’ button and then click ‘Add...’ and specify the source RTF file which contains all the text and links which will form the new help file. If a large help file has been split up into more than one source RTF file it is important to select ‘Add...’ several times.
After all the source files have been specified, the general help file settings can be customised. One of the first things to do is create a new window type and define its colours.
Having specified the RTF source file names and defined the various settings it is now time to compile the help file by clicking on ‘Save and Compile’ at the bottom of the window. During compilation any warnings and errors are reported. All errors should be corrected whereas warnings are less serious and some can be ignored by experienced Help file authors.
Now that the main help file has been created it is useful to write a contents file for it. To do this start up the Help Compiler Workshop once again and select File/New... and then Help Contents. A Window similar to the one shown below should appear.
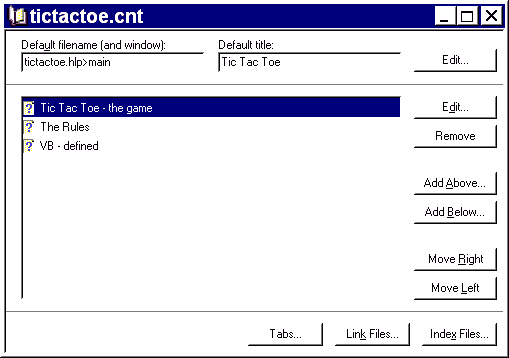
This contents file is quite simple with only three topics listed. However, larger contents can be created for more complex help files by the inclusion of various headings. These are represented as ‘Books’ which can open and close to reveal further levels in the hierarchy. To specify a heading select Add Above... or Add Below... and then select the Heading option button. Generating a contents file is easier if all headings are created before inserting topic entries.
Note: If using Word 97 to generate the source RTF files, do not use the Microsoft Help Compiler Workshop version 4.00.0950, instead use version 4.02.0060.
After the help file has been written and compiled it is ready for use by an application. This can be any application, it does not have to be one written in Visual Basic. To call a help file from VB follow the following steps:
Start Visual Basic and load or create a suitable project.
Go to the form where you wish to call help. On this form place a command button and set its caption to ‘Help’. This button will later be used by the user to signal that they wish some help. Alternatively, if the application already has a pulldown menu then add a new title named ‘Help’ and add an entry underneath entitled ‘Search for help on...’.
Next, on the same form place a Common Dialog control. Go to the properties window and set the entry named HelpFile to the path and filename of the newly created help file. If you have not made one yourself the help file which is supplied with Visual Basic can be called.
Back in the Click event of the command button add the following code:
Private Sub cmdHelp_Click ()
  Const cdlHelpPartialKey = &H105     ' Calls the search engine in Windows Help

  CommonDialog1.HelpCommand = cdlHelpPartialKey
  CommonDialog1.Action = 6
End Sub
The first line sets up a constant called cdlHelpContents and sets it to ‘&H3’. The required value for this constant and other help constants can be found in Visual Basic’s online help (the other help constants are also shown below). The next line specifies that we wish to display the contents page when we call the help file. And the last line which has Action = 6 specifies which type of dialog box to display. The number 6 refers to on-line help files.
| Constant | Value | Description |
|---|---|---|
| cdlHelpCommandHelp | &H102 | Displays Help for a particular command |
| cdlHelpContents | &H3 | Displays the contents topic in the current Help file |
| cdlHelpContext | &H1 | Displays Help for a particular topic |
| cdlHelpContextPopup | &H8 | Displays a topic identified by a context number |
| cdlHelpForceFile | &H9 | Creates a Help file that displays text in only one font |
| cdlHelpHelpOnHelp | &H4 | Displays Help for using the Help application itself |
| cdlHelpIndex | &H3 | Displays the index of the specified Help file |
| cdlHelpKey | &H101 | Displays Help for a particular keyword |
| cdlHelpPartialKey | &H105 | Calls the search engine in Windows Help |
| cdlHelpQuit | &H2 | Notifies the Help application that the specified Help file is no longer in use |
| cdlHelpSetContents | &H5 | Designates a specific topic as the contents topic |
| cdlHelpSetIndex | &H5 | Sets the current index for multi-index Help |
 TICTACTOE_HELP.ZIP (Windows Help file and source code for Tic Tac Toe example)
 http://www.helpmaster.com
 Tutorial 15 (Incorporating Sound)
 Menu
Menu Tutorial 17 (Creating and using ActiveX Controls)