
The objective of this tutorial is to learn how to create and use from Visual Basic a Crystal Report:
Understand what Crystal Reports are and when to use them.
How to create a Crystal Report based on an Access database.
Preview or print a Crystal Report from a Visual Basic application.
After creating a front-end to an Access 97 database in Week 12, it is likely that most applications of any complexity will need to use one or more reports to summarise or print the data. Although an Access database can contain built in reports Visual Basic is not able to access them. Instead, an application called the Crystal Report Designer must be used to open the Access database (other database formats can also be handled), set the tables and fields the report will use, graphically design the layout of the report, and then save this report into a separate crystal report file. This crystal report file can then be accessed by a Visual Basic application by using the crystal report control.
Start the crystal report designer by selecting ‘Report Designer...’ from the ‘Add-Ins’ pull-down menu in Visual Basic.
Note: The first time crystal reports is run the application will ask for various user details, this only needs to be completed once.
Once in crystal reports select ‘New...’ from the ‘File’ menu to start creating a new report. For those not experienced with crystal reports it is probably easiest to click on ‘Custom >>>’ and then select ‘Custom Report’ (see screenshot below). The ‘Custom Report’ should stay depressed once clicked; next click on the ‘Data File’ icon further to the right.
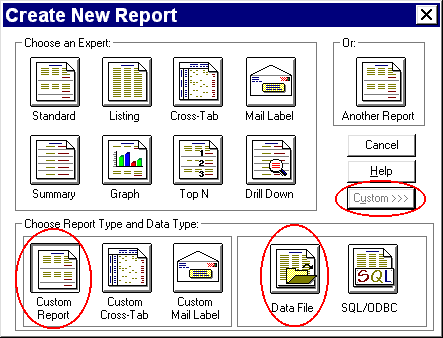
At the ‘Choose Database File’ dialog box select the database that the report will use for data. If you do not have a database already constructed then download the Access 97 database example.
At this stage the screen should look like:
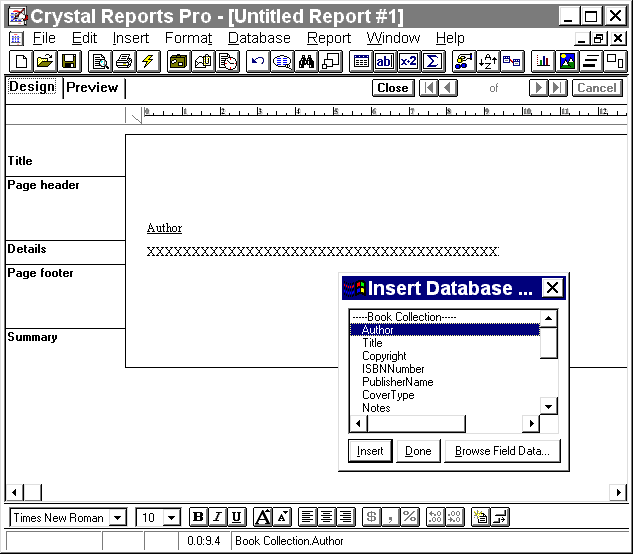
Drag the fields you wish to include in the report from the floating window into the ‘Details‘ line on the main window behind. In the screenshot above the ‘Author’ field has already been dragged into place. Repeat this process with some of the other fields. After all required fields are in place click the ‘done’ button on the floating window.
Many reports group related data together with headings or sub-totals. Taking the book database from the above example, it might be useful to sort all the book records by publisher. To do this select ‘Group Section...’ from the ‘Insert’ menu. In the dialog box which appears select the ‘PublisherName’ field and click on OK. This will add a new section to the report design layout (see below).
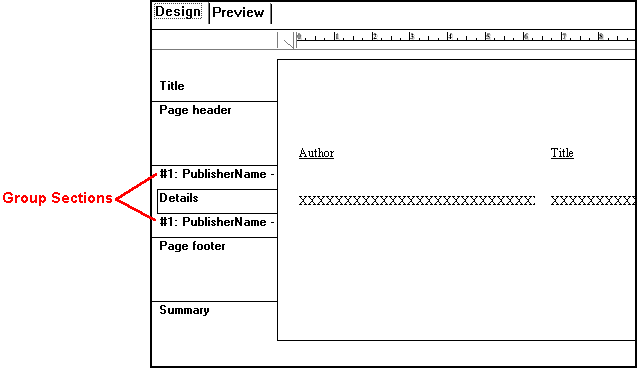
The next step is to put a new field into this section to display the publisher names. To do this select ‘Database Field...’ from the ‘Insert’ menu and drag the ‘PublisherName’ field from the floating window into the top section on the report design.
Once all the data fields have been included on the report the layout and format can be considered. To make the publisher names standout, select the field in the report design and then change its font style to bold and italic. By default the crystal report designer includes all column headings, but these can seem a bit redundant if the meaning of the data is obvious (which in this case it is). Thus, delete all text fields from the ‘Page header’ section. So users will know what the report is for it is a good idea to give it a title. This can be done by selecting ‘Text Field...’ from the ‘Insert’ menu and entering a suitable title in the dialog box which pops up. Position this text field in the ‘Title’ section of the report design and increase the font to a suitable size.
After completing all the formatting you can check the report by clicking the ‘Preview’ tab. If the resulting report seems a bit small, go to the ‘Report’ menu and select ‘Zoom’. When you are happy the report is complete and well designed you can save it (see ‘File’ menu).
Important: By default crystal reports do not alter when the underlying data in the database changes (this is highly stupid!). To avoid this problem go to ‘File/Options...’ and select the ‘Reporting’ tab. On this tab make sure that the ‘Refresh data on every print’ is checked.
If the crystal reports icon  is not visible in the toolbox then it needs to be added. To do this select ‘Components...’ from the ‘Project’ pull-down menu in Visual Basic.
Select the crystal reports control icon from the toolbox and place it on a form in the usual way. This control, like the timer, will be a small square rectangle which is hidden at run-time.
In the properties window set the ‘ReportFileName’ to the file name of the crystal report (*.rpt). After this set the ‘Destination’ property to ‘0 - crypToWindow’. It is advisable to display a new report on screen before sending it to the printer or a file. This property can be changed after the report has been checked and found to be OK.
To run the report add a button or pull-down menu entry and in its click event enter ‘CrystalReport1.PrintReport’.
Distribution Note: The dynamic link library ‘crpe.dll’ must be installed on any computer running crystal reports.
 Download Crystal Report example
 Tutorial 12 (Working with Access 97 Databases)
 Menu
Menu Tutorial 14 (Multiple Document Interface)