
The objective of this tutorial is to become familiar with what Events are and how they can be used. At the end of this tutorial you should be able to:
Know what an Event is.
Determine what Events a control can have.
Write code for one or more Events.
The ‘look’ of a Visual Basic application is determined by what controls are used, but the ‘feel’ is determined by the events. An event is something which can happen to a control. For example, a user can click on a button, change a text box, or resize a form. As explained in Creating a Visual Basic Application, writing a program is made up of three events: 1) select suitable controls, 2) set the properties, and 3) write the code. It is at the code writing stage when it become important to choose appropriate events for each control. To do this double click on the control the event will be used for or click on the  icon in the project window (usually top right of screen). A code window should now be displayed similar to the one shown below.
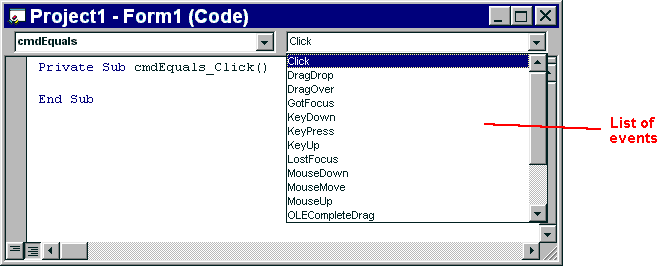
The left hand dropdown box provides a list of all controls used by the current form, the form itself, and a special section called General Declarations. The corresponding dropdown box on the right displays a list of all events applicable to the current control (as specified by the left hand dropdown box). Events displayed in bold signify that code has already been written for them, unbold events are unused.
To demonstrate that different events can play a significant role in determining the feel of an application, a small example program will be written to add two numbers together and display the answer. The first solution to this problem will use the click event of a command button, while the second will the change event of two text boxes.
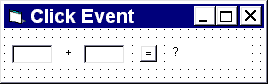
Before any events can be coded it is necessary to design the interface from suitable controls. As shown in the screen shot below use: 2 text boxes to enter the numbers, a label for the ‘+’ sign, a command button for the ‘=’ sign, and another label for the answer.
Note: Labels are used for the equals sign and the answer so that the user cannot alter them. Text boxes are alright for the two numbers because the user is required to change these.
Now that the user interface has been complete, double click on the command button to bring up a code window. Before writing any code check that the event is set to ‘Click’. It should already be set because this is the default event of a command button. Next, write the code to add the two numbers together and display it in the answer label. For those just beginning VB the code should look like:
  Private Sub cmdEquals_Click()
    lblAnswer.Caption = Str$(Val(txtNumber1.Text) + Val(txtNumber2.Text))
  End Sub
Run the program, enter a number into each text box and then click on the equals button.
In the first example the user has to enter two numbers and then explicitly click on the equals button to produce an answer. However, the program can be changed so that the answer will be calculated every time either of the two numbers are changed without requiring an equals button.
To do this first remove the equals command button and replace it with a label with the caption set to ‘=’. Now, bring up a code window and copy to the Windows clipboard the line lblAnswer = Str$(Val(txtNumber1.Text) + Val(txtNumber2.Text)). Using the left hand dropdown box select the first text box and then select the Change event from the right dropdown box. Then paste the code from the clipboard into the empty subroutine. Select the second text box and do the same. The same line is required twice because the two click events belong to two separate controls. The final code should look like:
  Private Sub txtNumber1_Change()
    lblAnswer.Caption = Str$(Val(txtNumber1.Text) + Val(txtNumber2.Text))
  End Sub

  Private Sub txtNumber2_Change()
    lblAnswer.Caption = Str$(Val(txtNumber1.Text) + Val(txtNumber2.Text))
  End Sub
Run the program again, enter the two numbers and observe what happens. Each time a digit changes the answer is recalculated.
Note: There may be times when recalculating more advanced problems takes too long on each change and so requiring the user to enter all the data first and then click on an answer button might more appropriate.
So far only one event has been used per control, however this does not have to be the case! Add a StatusBar control to the bottom of the form, bring up the code window using , select the first text box (txtNumber1) from the left hand dropdown box, and then select the GotFocus event from the right hand dropdown box. Now some basic instructions can be written in the status bar so that when the cursor is in the text box (the text box has focus) the status bar reads “Enter the first number”. After completing this change to the second text box and using the same GotFocus event change the statusbar text to “Enter a second number”. The code to set the status bar can be seen below.
  Private Sub txtNumber1_GotFocus()
    StatusBar.Panels(1).Text = "Enter the first number"
  End Sub

  Private Sub txtNumber2_GotFocus()
    StatusBar.Panels(1).Text = "Enter a second number"
  End Sub
The completed program should now have two text boxes which recalculate an answer using a Change event and update the statusbar when they receive a GotFocus event.
 Tutorial 1 (Exploring the Visual Basic Environment)
 Menu
Menu Tutorial 3 (Command Buttons, Option Buttons and Check Boxes)