


The objective of this tutorial is to learn the distinctive features of command buttons, option buttons and check boxes and to be able to use each of these within a VB program. At the end of this tutorial you should be able to:
Create each of these control types from the toolbox and arrange them on a form.
Add appropriate captions to the controls.
Provide simple code to make the controls respond to a click event.
Group controls using a frame.
Make a simple alteration to the interface, such as changing background colour, at run time.
In the last tutorial you selected an icon from the VB icon library, found in ...\Vb\Graphics\icons\, and loaded it in to a picture box. This technique will be used again, but instead of simply loading one icon, we will explore how to give the user a choice and load one or more of a selection of icons. The syntax of the LoadPicture command is given again below.
Picture1 = LoadPicture("C:\Program Files\DevStudio\Vb\Graphics\icons\Win95\Mycomp.ico")
This statement loads the icon specified in the path between the quotation marks, into the picture box called Picture1.
Use VB on-line help to complete the following exercises.
Option Buttons
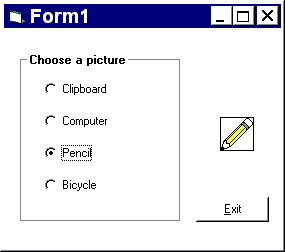
Create an application which operates like the screen shots below.
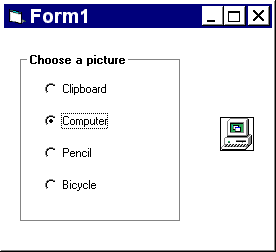
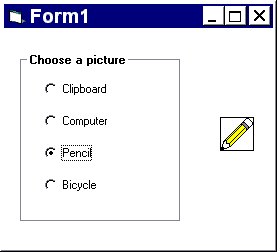
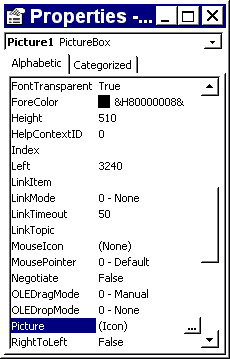
All the icons required can be found in the icon library. To view the contents of the icons sub-directories, click on the picture property of your picture box in the properties window, then on the ... button to the right of the settings box (see below). Many of the icons have meaningful names such as bicycle.ico, others (such as mac01.ico) must be loaded into the picture box to see exactly what they contain.
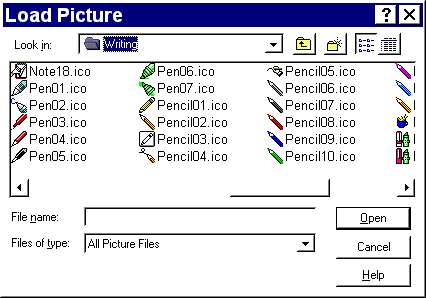
A welcome addition to Windows 95 and NT is the ability to preview icons and cursors in the ‘Open Picture’ dialog box as shown below.
Note: If you create the frame first and then add the option buttons by single clicking on the toolbox and dragging the cross hair cursor on the frame to create the controls, they will be attached to the frame and will move with it if you decide to re-position the frame. Notice, however, that if you create the frame first and double click the screen controls, then drag them from the centre of the form on to the frame, they will not be attached to it and will be left behind when you try to move the frame. Try this out.
Notice that when you run your application the same icon is loaded first (probably the clipboard, if you created that option button first). You can alter the option that has the focus first, by selecting one of the other option buttons and setting its property tabindex to 1.
‘Exit’ command button
At present the application has no quit mechanism, you have to stop it by selecting  from the toolbar. Add a command button to provide a user-activated means of stopping the program. All you need to do it put the statement ‘end’ in the command button’s click event
Check Boxes
Option buttons are mutually exclusive, they only allow one option to be selected. Supposing we want to present a user with a number of options one or more of which can be chosen. In this case check boxes are appropriate. Create an application like the one pictured below. The user chooses the items he/she needs by clicking on the check boxes. Icons are displayed for selected items. Clicking on a de-selected check box selects it, clicking on a selected check box (one containing a cross) de-selects it. The check box property value is set to 1 by a selection and 0 by a de-selection.
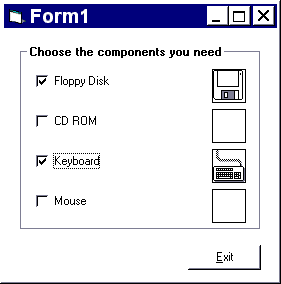
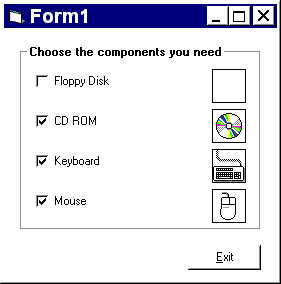
This application requires the insertion of some program code behind the click event for each check box to say ‘if the check box is selected, display the appropriate icon, otherwise blank out the picture box’. This logic is achieved in VB by a conditional statement (an if statement) that tests the status of the checkbox property value. Specimen code for the first check box is given below. Study the code to work out what it does. Enter this code for check box 1 (remembering to change the drive in the icon path statement). This code can be cut and pasted into the click events of the other check boxes, then modified to refer to check2.value and picture2 and so on for check3 and check4.
  Private Sub Check1_Click ()
    If Check1.Value = 1 Then
      Picture1 = LoadPicture("C:\VBP\ICONS\COMPUTER\DISK02.ICO")
    Else
      Picture1 = LoadPicture()
    End If
  End Sub
If you created your program by loading in the icons direct from the properties window, when you run the program all the icons will be displayed, though the check boxes are all, as yet, de-selected. To fix this and make sure that all the picture boxes are blank at the start of the program, go into the code window for Form1’s Load event. This is done by double clicking on the form in design mode. From the code you have already used for check box click events, you should be able to work out what is needed here.
Finally, try giving the picture boxes a background colour set at runtime. Consult VB Help under function QBColor (the most straightforward colour function) to find out how to set colours. QBColor takes a single parameter between 0 (black) and 15 (white). In the code below a background colour statement has been added to the previous code before display of the icon. A second statement has been added to change the background back to white before loading of the null picture (i.e. blank out the picture box). Alternatively, colours can also be set by copying the hexidecimal number displayed in the ‘Properties’ window and pasting it into the code where necessary.
  Private Sub Check1_Click ()
    If Check1.Value = 1 Then
      Picture1.BackColor = QBColor(10)
      Picture1 = LoadPicture("C:\VBP\ICONS\COMPUTER\DISK02.ICO")
    Else
      Picture1.BackColour = QBColor(15)
      Picture1 = LoadPicture()
    End If
  End Sub
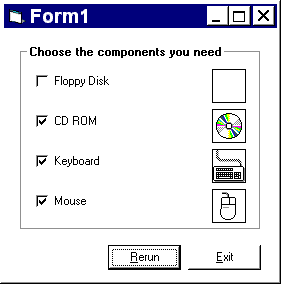
Second Command Button
Add a second command button to the interface a shown below. The function of the Rerun button is simply to set all the checkbox value properties to 0. The code behind it therefore consists of just four statements, the first of which is check1.value=0. Add the code for the Rerun button then run the application again. Are you surprised that clicking the Rerun button appears to blank out the picture boxes as well as de-select the check boxes? How does this happen and what does it tell you about how VB works?
 Download ‘Theatre Booking System’ example
 Tutorial 2 (Understanding Events)
 Menu
Menu Tutorial 4 (List Boxes and Combo Boxes)