

Often it is useful to create a set of controls that can be referred to by the control name plus index. In this way it is possible to:
Have a number of controls share the same code.
For example, we might have a set of text boxes on the screen and want to highlight whichever one the mouse is over. This can be done by creating the text boxes as an array and programming the MouseMove event to highlight the current one (and de-highlight the previously selected one). With a control array, all the objects in the array respond to the programmed events, only one piece of code is needed to cover them all, thus avoiding the need to duplicate the code behind every individual control.
Have a set of controls do something where the function of each is related to its position in the array.
For example, in the VB calculator application the command buttons representing the numbers 0-9 were created as a control array. The index position of each command button in the array corresponded to the number on its caption. Clicking any of these buttons executed the same piece of code, and the index of the button clicked was used to display the appropriate character ‘0’-‘9’ in the readout text box.
This is easy to do. Select a control, of the type you want the control array to be, from the toolbox and place it on a form in the normal way. Select this control by clicking on it and then choose ‘Copy’ from the ‘Edit’ menu. Next select ‘Paste’ from the same menu and you should see the following alert box displayed:

Click on ‘Yes’ to start a control array. Selecting ‘No’ will copy the control but will rename it and not start a control array. By this stage there should now be two controls on the form. Both will have the same name, but the first one created will be assigned the array index 0 and the second one array index 1. Keep selecting ‘Paste’ as many times as needed until you have the desired number of controls in your array.
The important thing to remember when referring to array elements is the index. Just to get the hang of using control arrays this task will change the background colour of all 5 text boxes in the array after clicking on a button.
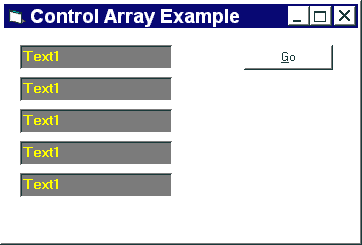
First create a form and place on it a set of five text boxes (see screenshot below) which are all part of the same control array. Now, set the ‘forecolor’ property of all the text boxes to yellow. This can be done by clicking and dragging (starting just top left of the first box and finishing just bottom right of the last one) to select all the boxes, then setting the colour as usual from the properties window.

Add a command button to the form and place the following code behind the ‘click’ event.
  Private Sub cmdGo_Click ()
    Dim i As Integer

    For i = 0 To 4
      text1(i).BackColor = QBColor(i)
      text1(i).Text = i
    Next i
  End Sub
Run the program and make sure that you thoroughly understand what it does.
Keep the same interface as Task #1 above, but remove the command button. Next create a status bar  at the bottom of the form and set its ‘Style’ property to sbrSimple. Program the ‘MouseMove’ event of Text1() so that:
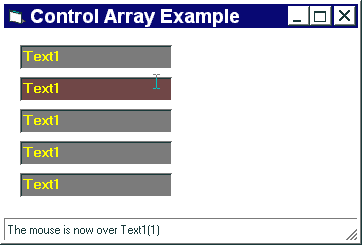
As the mouse moves over the text boxes, the backcolor of the current one turns deep red and all the others are gray.
The status bar lists which text box the mouse is currently on, e.g. “The mouse is now over Text1(3)”.

The first parameter (‘index’) of the ‘MouseMove’ event subroutine is an integer holding the element number of the textbox control currently being moved over. This parameter variable is used in the code listed below. The subroutine works by using a for loop which goes round each element of the control array and checks whether it is the same number as the ‘index’ parameter. If it is then it sets the background colour to deep red, but if not it sets it to dark grey.
  Private Sub Text1_MouseMove (index As Integer, Button As Integer, Shift As Integer, X As Single, Y As Single)
    Dim i As Integer      ' declare a variable to use as a counter

    For i = 0 To 4        ' because there are five text boxes
      If i = index Then   ' this is the one to highlight
        text1(i).BackColor = QBColor(4)   ' deep red
      Else
        text1(i).BackColor = QBColor(8)   ' dark grey
      End If
    Next i

    StatusBar1.SimpleText = "The mouse is now over Text1(" & Index & ")"
  End Sub
The code used in Task #2 solves the problem but is a bit inefficient. For example, every time the mouse moves all textbox backgrounds are reset. In practice only two textboxes can change at any one time: the textbox under the mouse (change to deep red), and the old textbox which was under the mouse which now needs to be turned back to dark grey once again. Because Task #2 sets all textboxes on every move, regardless of whether they need to be changed or not, the textboxes can seem to flicker a bit when the program is run.
This inefficiency problem can be solved by modifying the Task #2 code so that only the new and previous textbox backgrounds are ever altered. The code to do this could look somthing like:
  Private Sub Text1_MouseMove (index As Integer, Button As Integer, Shift As Integer, X As Single, Y As Single)
    Static bytPrevious as Byte

    If Index <> bytPrevious Then
      Text1(Index).BackColor = QBColor(4)       ' set new to deep red
      Text1(bytPrevious).BackColor = QBColor(8) ' set previous to dark grey
      bytPrevious = Index                       ' store current index in prev

      StatusBar1.SimpleText = "The mouse is now over Text1(" & Index & ")"
    End If

  End Sub
The variable ‘bytPrevious’ is declared as a local variable because this is the only subroutine in the whole program which needs access to it. However, it has been declared with the ‘Static’ keyword instead of ‘Dim’ so that its value is preserved after the subroutine finishes. Standard (Dim) local variables are always destroyed after the subroutine in which they are declared terminates.
 The Tic Tac Toe example uses a control array
 Tutorial 5 (Menus and List Manipulation)
 Menu
Menu Tutorial 7 (Vertical & Horizontal Scroll Bars and Animation)