

Create applications consisting of more than one form.
Include in applications forms that have been created previously.
Provide simple code to enable users to navigate between forms at run time.
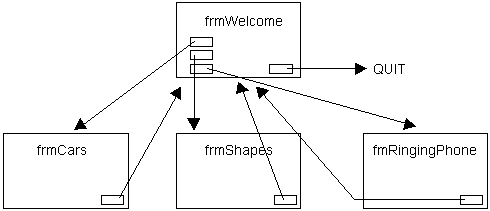
When VB is launched it provides a blank form called Form1. All but the most trivial programs consist of more than one form. For example, it is common to have a welcome screen offering a number of options and for each of these to branch to different forms. The high level structure of an interactive application can often be understood best from a diagram showing the forms hierarchy. Imagine a computer-based learning package containing a number of modules, each of which has a number of forms associated with it.
  frmX.Hide
  frmY.Show
Note: The name of the form to be hidden or shown is the ‘internal’ name used by VB. This is the name displayed in the right hand column of the Project window and is the nane displayed for a form in the Properties window. Do not confuse this with the name of the form when it gets saved to disk, this name will have the extension .FRM.
Note: Every form which is displayed (shown) in Visual Basic is first loaded into memory and even when it is hidden it still remains loaded in memory. This is not a problem with two or three forms, but above this and you can run out of available memory. If this happens the solution is to discard some of the forms not required. Use the Unload command to do this:
Unload frmX
Conversely the Load command can be used to load a form into memory but without displaying it. It should also be noted that the command Show will automatically load a form if it is not already loaded, and the command Unload will automatically hide a form if it is not already hidden before being unloaded.
 |
frmX.Hide
Unload frmX
This is code will run perfectly but the first line is superfluous since VB automatically hides any visible forms before they are unloaded from memory |
 |
Unload frmX
frmX.Hide
The form frmX will automatically be hidden and then unloaded from memory on line 1, then on line 2 the program wishes to hide the form. Because the form which is to be hidden is no longer in memory VB automatically loads it. Thus, the code in line 1 is counteracted. |
 |
Unload frmX |
 |
Load frmY
frmY.Show
This code will work perfectly but the first line is unnecessary since VB performs a load automatically if the form to be displayed is not already in memory. The only situation where Load should be used is if you wish to load a form into main memory, perform some other actions, and then later actually show the form. |
 |
frmY.Show |
Just to get the idea of creating multi-form applications quickly, create a master program to contain several of the tutorial exercises completed already.
Start a new project. The first form should be a welcome screen (called frmWelcome), use graphical techniques to make it look attractive. Include on the form three command buttons with appropriate pictures on them to represent the applications you want to include (perhaps the language tutor, restaurant program and animation program). Add a Quit button to terminate the program.
Using the Add File option, load the forms for these applications into your project. The forms will have to have unique names before you load them - hopefully they have been named sensibly and are not all called Form1!
Code the command buttons on the welcome screen to hide that screen and show the appropriate next one.
If the subsequent screens have Quit buttons, change the captions on these and program them to return to the welcome screen. If not, add new buttons to perform this function.
If public variables have been used you will need to preserve these in a shared Module1.bas, resolving any duplicate names.

See if you can work out how to return the program automatically to the welcome screen if there is no interaction from the user for one minute. Hint: You will need to use the Timer control  , the MouseMove event and a global variable to act as a ‘clock’. Please read Timing events in Visual Basic or use VB’s online help to find out how the Timer works.
 See also Tutorial 14: Multiple Document Interface (MDI)
 Tutorial 8 (Animation and Graphics)
 Menu
Menu Tutorial 10 (Using the Grid Control)